Hi,
I write down some usefull Powershell scipts that I use in SCSM 2012. Mostly they are close to each other in logic, but minor changes returns different results. I recommend you check these and modify according to your needs.
#Closed and resolveddate is null and adding 2 days to resolved date as closeddate
$Incidents = @(Get-SCSMObject -Class (Get-SCSMClass -Name System.WorkItem.Incident$) | Where-Object {$_.Status -like "*Closed" -and $_.ResolvedDate -eq $NULL})
foreach ($Inc in $Incidents)
{
Set-SCSMObject -Property ResolvedDate -Value ($Inc.ClosedDate).AddDays(-2) -SMObject $Inc
}
#Status Closed but no Closeddate inserted, assigning last modified date as closeddate $Inc1 = @(Get-SCSMObject -Class (Get-SCSMClass -Name System.WorkItem.Incident$) | Where-Object {$_.Status -like "*Closed" -and $_.ClosedDate -eq $NULL})
foreach ($Inc in $Inc1)
{
$Inc | set-scsmobject -Property ClosedDate -Value $Inc.LastModified
write-host $Inc.Name $Inc.ClosedDate
}
#Getting the time difference between lastmodified and resolveddate $Last = @(Get-SCSMObject -Class (Get-SCSMClass -Name System.WorkItem.Incident$) | Where-Object {$_.Status -like "*Closed*" -and $_.closedDate -eq $NULL})
foreach ($L in $Last)
{
$fark = ($L.lastmodified-$L.resolvedDate).duration()
write-host $L.Name /created/ $L.createddate /resolved/ $L.resolveddate /saat/ $fark.TotalHours
}
#Status Closed but closeddate is empty, Adding 2 days to Resolveddate as a closeddate value $Incidents = @(Get-SCSMObject -Class (Get-SCSMClass -Name System.WorkItem.Incident$) | Where-Object {$_.Status -like "*Closed" -and $_.closedDate -eq $NULL})
foreach ($Inc in $Incidents)
{
Set-SCSMObject -Property ClosedDate -Value ($Inc.ResolvedDate).AddDays(2) -SMObject $Inc
}
Tuesday, November 26, 2013
Friday, November 22, 2013
Closing resolved incidents automatically in SCSM with Powershell and/or with SCSM tasks
Hi,
Today, I am going to write down the steps and a powershell script I used for closing resolved incidents automatically in SCSM and/or with SCSM tasks. To note, the environment I work on is a SCSM 2012 SP1 on a 2008 R2 SP1 server.
I had a need for closing incidents after sometime when incidents left resolved but not closed by users. Therefore, we agreed on closing resolved incidents after 2 days automatically with SCSM using a Powershell script running as a scheduled task.
If we explain briefly, what we are going to do is;
Import-Module SMLets
$LogFilename = "anypath\yourlogname.log"
$SMDefaultComputer = "SCSM management computer name"
$Date = (get-date)
$DateString = $Date.toString()
$2DaysOld = (get-date).addhours(-48)
$Incidents = @(Get-SCSMObject –Class(get-scsmclass system.workitem.incident$) | where{$_.resolveddate -lt $2DaysOld -and $_.status -like "*resolv*"})
foreach ($Inc in $Incidents)
{Add-Content -Path $LogFilename ($Date.toString() + " - Any description you desire - " + $Inc.ID + " - " + $Inc.Title)
sleep 1
set-SCSMObject –property Status -Value Closed -SMobject $Inc
Set-SCSMObject –property ClosedDate -Value $Date -SMobject $Inc
}
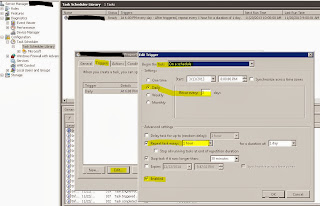
Save your powershell script to anywhere you want, then you can add as a scheduled task into Task Scheduler like below;
Configure and trigger the script for everyday every 1 hour period;

If you want to Add the script as a task into SCSM console;
On the console go to Library-->Tasks section and create new task. Enter name and description, select "Incident" as target class, choose a custom management pack or create a new one.

Move down to command line tab and fill areas as in screenshot;

Now you will be able to see the task on your consoles Tasks Pane on the right side.

I hope this blog will help you getting over the issue.
C u!..
Today, I am going to write down the steps and a powershell script I used for closing resolved incidents automatically in SCSM and/or with SCSM tasks. To note, the environment I work on is a SCSM 2012 SP1 on a 2008 R2 SP1 server.
I had a need for closing incidents after sometime when incidents left resolved but not closed by users. Therefore, we agreed on closing resolved incidents after 2 days automatically with SCSM using a Powershell script running as a scheduled task.
If we explain briefly, what we are going to do is;
- For a later use to use as a task on any console importing SMLets module, log file path and name, SM management computer name,
- Getting the date script run and getting incidents both resolved and resolved date more than 48 hours,
- For each incident filtered closing the incident and inserting the closed date while writing to the log file specified before.
- Preparing a scheduled task for automation of the script.
- If desired adding as a task on console to run manually when desired.
Import-Module SMLets
$LogFilename = "anypath\yourlogname.log"
$SMDefaultComputer = "SCSM management computer name"
$Date = (get-date)
$DateString = $Date.toString()
$2DaysOld = (get-date).addhours(-48)
$Incidents = @(Get-SCSMObject –Class(get-scsmclass system.workitem.incident$) | where{$_.resolveddate -lt $2DaysOld -and $_.status -like "*resolv*"})
foreach ($Inc in $Incidents)
{Add-Content -Path $LogFilename ($Date.toString() + " - Any description you desire - " + $Inc.ID + " - " + $Inc.Title)
sleep 1
set-SCSMObject –property Status -Value Closed -SMobject $Inc
Set-SCSMObject –property ClosedDate -Value $Date -SMobject $Inc
}
Add-Content -Path $LogFilename (".")
Save your powershell script to anywhere you want, then you can add as a scheduled task into Task Scheduler like below;
Configure and trigger the script for everyday every 1 hour period;

In "Program/script" section enter;
C:\Windows\System32\WindowsPowerShell\v1.0\powershell.exe
In "Add arguments" section enter;
C:\YourPathWhereScriptSaved\YourScriptFilename.ps1

If you want to Add the script as a task into SCSM console;
On the console go to Library-->Tasks section and create new task. Enter name and description, select "Incident" as target class, choose a custom management pack or create a new one.

Move down to command line tab and fill areas as in screenshot;

Now you will be able to see the task on your consoles Tasks Pane on the right side.
I hope this blog will help you getting over the issue.
C u!..
Friday, November 15, 2013
SCOM management packs list
It is useful to track all SCOM management pack updates and new releases from the link below;
http://social.technet.microsoft.com/wiki/contents/articles/16174.microsoft-management-packs.aspx
http://social.technet.microsoft.com/wiki/contents/articles/16174.microsoft-management-packs.aspx
Microsoft Silverlight release history
Hi,
Link below will help you follow Silverlight release history;
http://www.microsoft.com/getsilverlight/locale/en-us/html/Microsoft%20Silverlight%20Release%20History.htm
Link below will help you follow Silverlight release history;
http://www.microsoft.com/getsilverlight/locale/en-us/html/Microsoft%20Silverlight%20Release%20History.htm
Tuesday, November 12, 2013
How to install HP Proliant VMM 2012 Integration Kit on Windows Server 2012 R2 RTM
Today I am going to talk about HP Proliant VMM 2012 Integration Kit. Our test environment is VMM 2012 R2.
First thing to do is downloading latest Integration kit for VMM 2012 which is "Insight Control for System Center 7.3.1 DVD ISO - Sept 2013" for this post. You can download ISO package from the link below;
https://h20392.www2.hp.com/portal/swdepot/displayProductInfo.do?productNumber=HPICE

When you click the 7.2 link page will be scroll down to 7.2 download section. There after, when you click the download page will scroll down to the end and then you will see the receive for free button.

Then, Fill the form and then select Insight Control for System Center 7.3.1 DVD ISO - Sept 2013. Recommended to use HP download manager.

After download finished move to VMM management server and stop VMM services. Mount ISO and start autorun. Select VMM 2012 Integration Kit and follow the steps as follows;


Injecting drivers into WinPE boot image is another topic now discussed here therefore just click next.

Installed completed. Now start VMM services and move to Library tab, right click library server and click Refresh. You should see HP folder and subfolders like in the screenshot below;

Friday, September 20, 2013
How to create a Service Map with SCOM 2012 SP1 and import into SCSM 2012 SP1
After a nearly 1 year work, we prepared several service maps outside SCOM with "XMind" tool.
When all logical service maps completed, to it was time to create them in SCOM as distributed applications.
After that, I needed to move Management Packs (MP) and Distributed Applications (DA) to SCSM environment.
Written down in brief, lets see whole work in deep:
Designing Service Maps with XMind;
Download Xmind for Windows from http://www.xmind.net/download/win/ and install it for example to your Win7/Win8 PC.
Design your Service, in my Example it is Monitoring Services, where hardware, software, dependent services, customers and settings are core functions of your service. Keep in mind that it is a logical map.

Creating DA's in SCOM 2012;


An example of completed Service Template..

Exporting MP's from SCOM and importing into SCSM 2012;
When you finish your DA's in SCOM now it is time to import related MP's (used MP's corresponding Configuration Items for example you have to import Server 2008 MP if 2008 computer used as CI) into SCSM.
Export your MP including your custom DA from SCOM;

When you try to import your custom DA you will get an error. You have to import .mp type sealed MP's.

Analyze the error, check event viewer SCOM logs and then import dependent MP's to SCSM first.


Importing DA's to SCSM 2012;
After all dependent MP's imported, you can start importing your DA. If you add new CI' depending other MP's you have to import new depending MP's, too. In this step you don't have to seal your custom DA, therefore .xml type will be ok. For a further step, you must seal it for synchronizing it to SCSM Datawarehouse.
Creating SCOM CI Connector and Synchronizing MP's from SCOM;
It is time to create a SCOM CI connector. On Administration Screen click connectors and click "Create connector" and then operations manager CI connector. fill name and server details then create a runas account to connect SCOM. After testing your connection click refresh to get list of configurations going to be imported related to MP's you imported.

Get list of the classes included in your MP;

As you see nothing returns.
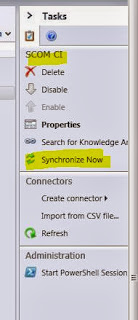
Synchronize it for the first time.
Configuring SCSM allow lists;
After competing first synchronization you have to declare which CI's be synchronized with SCOM. This is the most important step in SCSM side.
This is what I mentioned earlier. We have to tell SCSM to get aware of classes we created in SCOM. With a simple Powershell command list the classes included in your custom MP.

Add these classes to SCSM allow list.

Check your SCSM allow list to be sure;

Configuring Depending Services in SCSM;
From configuration items screen move to all business services this is where your all DA's viewed. As you see from screenshot all CI's and classes allowed in allow list will be listed.
 SCSM keeps service map properties and users information of business services in its database not in a MP meaning, if you delete your MP and import it again you will find your service map properties and users information areas empty :( So, get well organized before importing your custom MP's.

As a result, I tried to write down main concepts for creating a custom DA in SCOM and moving it to SCSM environment.
When all logical service maps completed, to it was time to create them in SCOM as distributed applications.
After that, I needed to move Management Packs (MP) and Distributed Applications (DA) to SCSM environment.
Written down in brief, lets see whole work in deep:
Designing Service Maps with XMind;
Download Xmind for Windows from http://www.xmind.net/download/win/ and install it for example to your Win7/Win8 PC.
Design your Service, in my Example it is Monitoring Services, where hardware, software, dependent services, customers and settings are core functions of your service. Keep in mind that it is a logical map.

Creating DA's in SCOM 2012;


An example of completed Service Template..

Exporting MP's from SCOM and importing into SCSM 2012;
When you finish your DA's in SCOM now it is time to import related MP's (used MP's corresponding Configuration Items for example you have to import Server 2008 MP if 2008 computer used as CI) into SCSM.
Export your MP including your custom DA from SCOM;

When you try to import your custom DA you will get an error. You have to import .mp type sealed MP's.

Analyze the error, check event viewer SCOM logs and then import dependent MP's to SCSM first.


Importing DA's to SCSM 2012;
After all dependent MP's imported, you can start importing your DA. If you add new CI' depending other MP's you have to import new depending MP's, too. In this step you don't have to seal your custom DA, therefore .xml type will be ok. For a further step, you must seal it for synchronizing it to SCSM Datawarehouse.
Creating SCOM CI Connector and Synchronizing MP's from SCOM;
It is time to create a SCOM CI connector. On Administration Screen click connectors and click "Create connector" and then operations manager CI connector. fill name and server details then create a runas account to connect SCOM. After testing your connection click refresh to get list of configurations going to be imported related to MP's you imported.

Get list of the classes included in your MP;

As you see nothing returns.

Synchronize it for the first time.
Configuring SCSM allow lists;
After competing first synchronization you have to declare which CI's be synchronized with SCOM. This is the most important step in SCSM side.
This is what I mentioned earlier. We have to tell SCSM to get aware of classes we created in SCOM. With a simple Powershell command list the classes included in your custom MP.

Add these classes to SCSM allow list.

Check your SCSM allow list to be sure;

Configuring Depending Services in SCSM;
From configuration items screen move to all business services this is where your all DA's viewed. As you see from screenshot all CI's and classes allowed in allow list will be listed.


As a result, I tried to write down main concepts for creating a custom DA in SCOM and moving it to SCSM environment.
Installing VMM 2012 R2 Preview by single server scenario on Windows Server 2012 R2 RTM
I talked about installing VMM 2012 SP1 on my previous blog, now it is time to install VMM 2012 R2 Preview on Windows Server 2012 R2 RTM.
A- Installing Server 2012 R2 RTM
After completing server 2012 RTM installation add accounts to administrator group as in my previous blog and then install .NET 3.5 from Powershell;

B- Completing VMM 2012 preview Prerequisites;
1) ADK 8.1
2012 R2 comes with Powershell 4 therefore you don't need to install Powershell 3.0 etc. It can br check if desired like;
PS C:\Windows\system32> $host.version
Major Minor Build Revision
----- ----- ----- --------
4 0 -1 -1
Start Installing as in screenshot;
 2) SQL Server Command line utilities;
You can look from my previous blog. http://borgamentes.blogspot.com/2013/09/how-to-install-vmm-2012-sp1-and.html
3) SQL Server 2012 SP1
You can look from my previous blog. http://borgamentes.blogspot.com/2013/09/how-to-install-vmm-2012-sp1-and.html
C-Installing VMM 2012 R2 Preview
Download System Center 2012 R2 Preview version from http://technet.microsoft.com/en-us/evalcenter/dn205295.aspx and run the exe related to VMM. It extracts setup files to "C:\SC2012 R2 PREVIEW SCVMM" as default path. Then run setup.exe from the path.


Click next and finalize installation.
A- Installing Server 2012 R2 RTM
After completing server 2012 RTM installation add accounts to administrator group as in my previous blog and then install .NET 3.5 from Powershell;

B- Completing VMM 2012 preview Prerequisites;
1) ADK 8.1
2012 R2 comes with Powershell 4 therefore you don't need to install Powershell 3.0 etc. It can br check if desired like;
PS C:\Windows\system32> $host.version
Major Minor Build Revision
----- ----- ----- --------
4 0 -1 -1
Start Installing as in screenshot;

You can look from my previous blog. http://borgamentes.blogspot.com/2013/09/how-to-install-vmm-2012-sp1-and.html
3) SQL Server 2012 SP1
You can look from my previous blog. http://borgamentes.blogspot.com/2013/09/how-to-install-vmm-2012-sp1-and.html
C-Installing VMM 2012 R2 Preview
Download System Center 2012 R2 Preview version from http://technet.microsoft.com/en-us/evalcenter/dn205295.aspx and run the exe related to VMM. It extracts setup files to "C:\SC2012 R2 PREVIEW SCVMM" as default path. Then run setup.exe from the path.


Click next and finalize installation.
Monday, September 16, 2013
VMM 2012 using SMI-S provider to manage EMC Clarion cx3-10c
Hello guys,
I was planning to manage our EMC Clarion cx3-10c storage unit with VMM 2012 SP1. I had configured before on VMM 2012. Actually, it is not I a big issue except configuring the SMI-S Provider. Provider configuration is a little bit tricky but don't give up. If you are lucky at first try you will pass that step without any problem.
To mention, my test environment is VMM 2012 SP1 UR3 on Windows Server 2012 with SQL Server 2012 SP1 CU5 on a single server design.
Lets start;
To mention, my test environment is VMM 2012 SP1 UR3 on Windows Server 2012 with SQL Server 2012 SP1 CU5 on a single server design.
Lets start;
First you need to install SMI-S driver on a server able to connect to your EMC storage unit. Selecting "Array Provider" is enough for completing installation.

Then, on the EMC console get/fill the appropiate areas. Also give permission to user you are going to use for SMI-S connection/authorization.

Type https://x.x.x.:x5989/ecomconfig into your browser, enter "admin" and "#1Password"as default username and password.

Using the menu below click "Add User"

as seen on menu;

After all done on EMC side Run "C:\Program Files\EMC\ECIM\ECOM\bin>TestSmiProvider.exe" and start to configure smiprovider.

Accept default values and enter the user name and password you added on ECOM Administration instead of the default ones on the screen shot.
Then enter parameters needed to configure;
addsys
y
1 (it is for Clarion systems)
x.x.x.x (enter the IP addresses of your storage unit IP's you entered steps before)
hit enter for blank
2 (address type meaning IP)
username
password

Use "disco" instead of "addsys" to check autodiscover the EMC storage units.
Up to here I have talked about configuring SMI-S and EMC Clarion. Now it is to time move VMM 2012 SP1 console. In VMM 2012 logic is the same but menus are a little bit different, nothing to worry about.
First create a "Runas Account" for SMI-S provider, we will use this account integration. Use username and password same as used before in smiprovider.
On "Fabric" menu move down to Storage section and right click Providers. Select SMS-S provider and continue,

On next screen enter your SMI-S provider server configured before, select 5988 and SMSI-S CIMXML and the user account created in VMM using browse; If you are unable to configure settings especially can not selecting TCP/IP port there is security update making it gray out. You have to uninstall the update.

Click next;

If you see the device in the list everything is fine, last step is selecting the storage pools and creating and assigning classifications.

Click next and end wizard.
I hope you are happy with all these! take care..
Subscribe to:
Posts (Atom)